Laughingbird Software
Saturday, October 5, 2024
Home Blog Page 14

Cutting and Cropping images with The Logo Creator

Today’s “Tutorial Tuesday” will show you a really cool “cropping” trick you can use to manipulate images in The Creator graphic design software.

Did you know The Logo Creator can cut and resize images (all without using Photoshop!) Watch this quick technique and see how easy cutting out part of an image is:

Make sure to watch the video FULL SCREEN and in HD for the full awesome power of YouTube:

Make a lower third without Photoshop

Hey Creatorpreneurs!

The Logo Creator graphic design software can do so much more than just logo design … and this tutorial is going to show you a really cool trick. Did you know it can make “lower third” graphics?

A ‘lower third’ graphic is simply text that is usually accompanied by a complimentary background graphic and is positioned on the lower third of the viewable area.

You can use it for your YouTube videos or use them as Watermarks. Watch over my shoulder as I show you how easy it is to create YouTube overlay images too!

Watch the video above to get the whole scoop on making your own lower third graphics

Create your own lower thirds with The YouTube Channel Graphics Creator

https://www.laughingbirdsoftware.com/downloads/youtube-channel-art-templates/

How To Build Social Media Love

Tips for Social Media Love: If You’re Curating, Add Something

We’ve all fallen victim to the whole posting, reposting, and retweeting curated content thing. It’s awesome to curate content! But there are ways to do it and ways not to.

When you do post something you find, show your reasons for posting it or your feelings about it by commenting yourself. When you add yourself and your opinions in, you really are adding value. That’s a social media love builder

Tips for Social Media Love: Easy On the Ads

We all use our networks to distribute promotions, coupons, and that kind of thing. But social media is called that for a reason. If you’re using it just to push your product, that’s not so social, and it can actually be pretty annoying for others.

Just time it and space it out so that seeing a deal or coupon from your small business is a welcome event for followers. This way you build customer loyalty instead of turning customers sour.

Tips for Social Media Love: Share Your Own Stuff

When you’re taking the time to blog for your small business or otherwise creating content, definitely share it on your networks. You took the time to create it, so show your followers what you’re about. You also continue to situate yourself as an expert in your field when you post useful content that you made. Experts get lots of social media love!

Tips for Social Media Love: Shout Out

You wouldn’t like it if you made a friendly comment to someone on the street or in a business and they just blew you off, right? And once might be a mistake, but if they never reply, that’s irritating! The same is true for the world of social media.

When folks take the time to shout out to you, respond. It’s polite, and it also shows your attention to detail and service. This is also the only way you can make social media an effective customer feedback tool.

Tips for Social Media Love: Your Mom Was Right—Be Yourself

Turns out Mom knows best! Being yourself even when you’re a business is a must in social media circles. It’s a fine line. I’ve posted before about how you don’t want to go too far in the other direction, and that’s true. You shouldn’t be Tweeting a zillion photos of your cat using your small business account. (And, let’s face it, you probably shouldn’t be doing that at all.)

But sure, let your customers know you have weekend plans or that something really funny happened to you at Walgreen’s. All of the sudden, you’re the woman who paints on the weekend or the guy who got coffee dumped on him at Starbuck’s—twice! It makes you human, and people remember that stuff. Of all of the tips for social media love, this one is my favorite.

So there you have it. The best tips for social media love. After all, why waste your time driving people nuts? It won’t help you or your business. Instead, be a careful social media marketer and feel the love.

Text in a circle generator

Hello Creatorpreneurs!

We’re excited to announce a new feature available within Graphics Creator, The text in a circle creator tool. This gives your the ability to quickly and easily place text around an object for your next masterpiece.

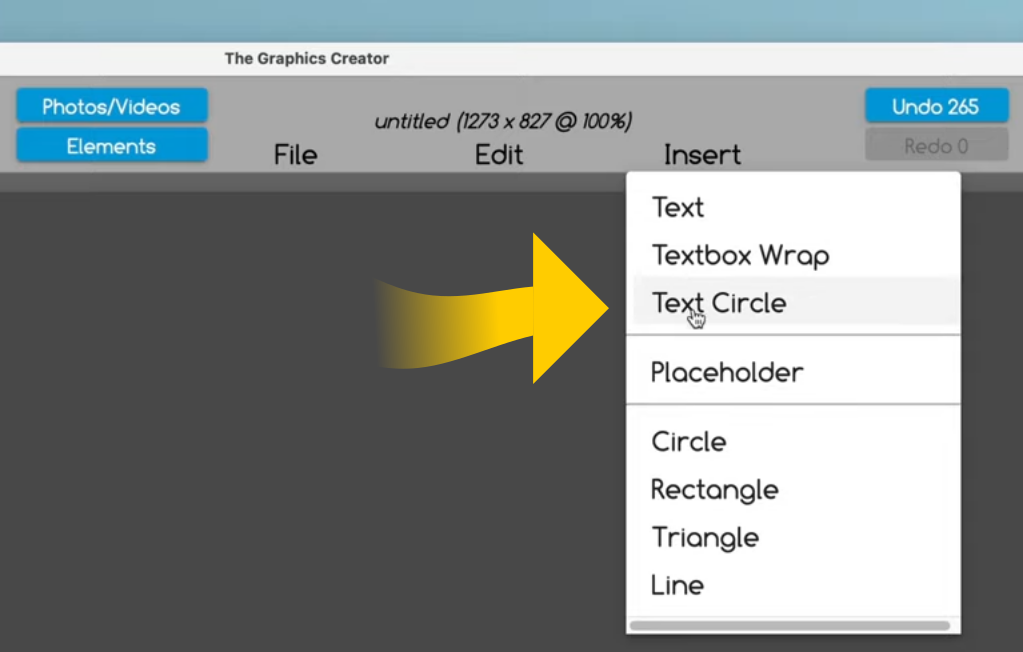
Circle text works a bit differently than normal text and this new feature can be found under the new Insert menu. You’ll find it in the menu: Text Circle option.  This opens a new menu for the Text Circle. 

From here, there are a bunch of additional controls you can use to make changes get exactly the look you want.

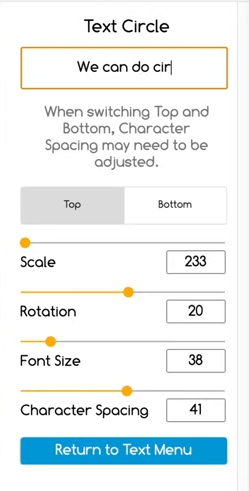
You can scale the size of the circle to fit around an object, you can rotate the text around the circle, and you can adjust both the font size and the spacing between the letters.

Normally in The Graphics Creator you change the text by double clicking, but when you’re using the Text Circle generator, it works a little differently. 

You add the text you want to show on the circle in the box at the top of the Text Circle menu. To make adjustments to the font, text color, and text effects, choose the blue box at the bottom of the Text Circle option Return to Text Menu.  This takes you to the Text Menu where you can make all the adjustments to the font that are normally available in Graphics Creator.

Under Text Format, you can choose which font you’d like to use.  If you have the downloadable version of the software, you can choose a system font.  Google fonts are available if you are using The Graphics Creator online. 

After choosing the font you’d like for your project, select the Return to Text Menu option.

You can manipulate the look of the text by selecting the Text Circle Format option which will take you back to the Text Circle menu.  Here you can scale and rotate the text.  You can also adjust the character spacing which will change how the letters spread around the circle.

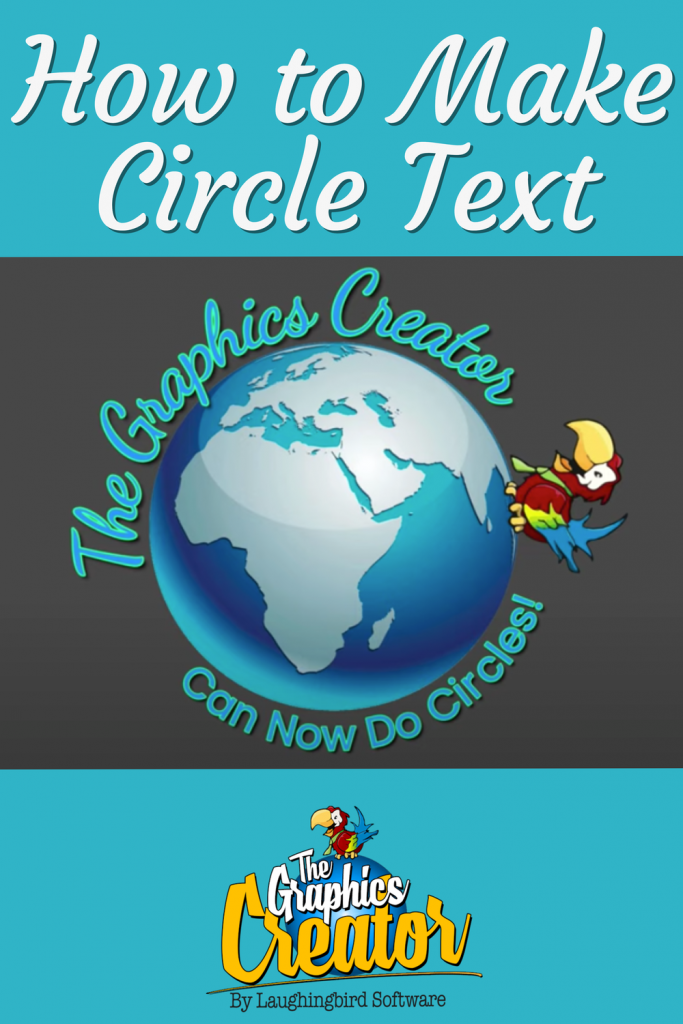
You can also move the text from the top of the circle to the bottom.  Text in the Top position will be along the outside of your circle and text in the Bottom position will be within the circle.  Text in either position can be adjusted for font and spacing as you’d like.  You can choose to have the top circle text in one font and the bottom circle in another like we did in the example photo.

You will probably have an image you’d like your text to circle around.  To adjust the text so it fits around your object you need to adjust the scale of the circle.  Adjusting the scale will not change the type or size of your text, only the circle.  Under the text you will see a thin blue line that represents the circle your text is on.  You can use this blue circle to get the size and placement set.

There are a few ways you can change the size of the circle.  First, there is a sliding adjustment in the Text Circle menu.  If you need to get a bit finer adjustment, place your mouse cursor on the small yellow dot on the Scale slider.  Click this small circle and it should enlarge to indicate that you are using this feature.  Simply tap your arrow keys to enlarge or reduce the circle on unit at a time until the circle is the size you need.

Inside Graphics Creator, we have a number of great templates for you to choose from, but most do not use the Circle Text feature (at least not yet!).  You can easily use the Circle Text feature to include text within any template you’d like.

Select the template you would like to use then Insert a new Text Circle.   Proceed as before by adding the word or words you’d like into the text box.  Adjust the font type, size and color to the font used in the template or choose a new font to match your project.  Remember that you can scale the circle to fit around an image and you can rotate the text into position.

Have a good time using this new feature in Graphics Creator.  We’d love to see how you use the Circle Text to create your images so please share your designs with us by posting in the LaughingBird Software group on Facebook.

How to Wrap Text in a Circle with The Graphics Creator

Today, we’re proud to announce that The Graphics Creator Software can now wrap text in a circle!

You don’t need Photoshop, or Gimp, or Canva. All you need is The Graphics Creator by Laughingbird Software.

The Graphics Creator is downloadable software for both Mac and Windows computers. AND, there’s an online version that you can use with any browser, anytime… and from any place.

Watch the video on creating text on a circle with The Graphics Creator.
Comment below to let us know what you think of this awesome new feature!

The Graphics Creator has become the easiest way to create your own designs and social media graphics . It’s used all over the world for content marketing and visual communication.

It’s the best Photoshop and Canva pro alternative on the market… PLUS, it’s way easier than Photoshop and way more flexible than Canva.

And… as with all Laughingbird Software products, you’ll have access to our Creatorpreneurs Academy: Learn smart money tactics and creative marketing strategies – every week!

Learn how to make circle text with The Graphics Creator Software by watching this short video
Share on Pinterest!